DIY Troubleshooting
If you are having a problem with your pump, here are a few things you can try for yourself. This applies to non-variable speed systems.
Step 1
Look for a control box. It will most likely say Franklin Electric but could also say Grundfos or Pentek.
It will most likely look look like this… (Image 1)
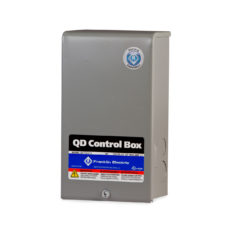
It could also look like this… (Image 2)
Once you find it, look for the horsepower rating (HP)
Image 1
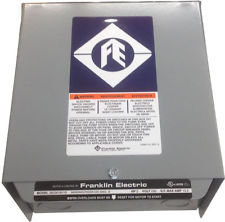
Image 2
Step 2
If it is .5HP or 1HP (Image 2) skip step 3 down to step 4.
Image 3

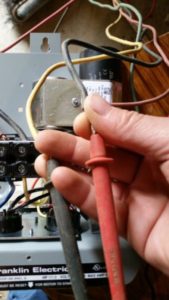
Step 3
For 1.5HP and higher pumps look for the red reset buttons underneath the bottom of the control box and press them hard. (Image 3)
-If it clicks and the pump runs for more than 30 seconds and turns itself off normally, you probably just need control box parts, give us a call and we can come out or you can bring the control box to us and we can put parts into it to save you a service call.
-If it clicks and you hear the pump run for a few seconds then you hear a pop then you either need control box parts or the pump is locked up, and you can give us a call to come out.
-If they are not tripped (they don’t click) then move on to step 4.
Step 4
Find the pressure switch. It is usually a grey box with square D written on it, and it looks like this…(Image 4).
Once you have found the switch try hitting it (with the cover on). You want to hit it with a slight amount of force as not to break it but definitely harder than just tapping it.
You can also try opening and closing the points with a screwdriver by prying on the plate…(Image 5).
-If the pump does not run or make any noise after this move on to step 5.
Image 4
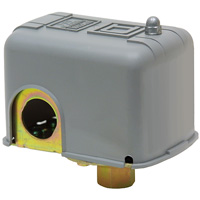
Image 5
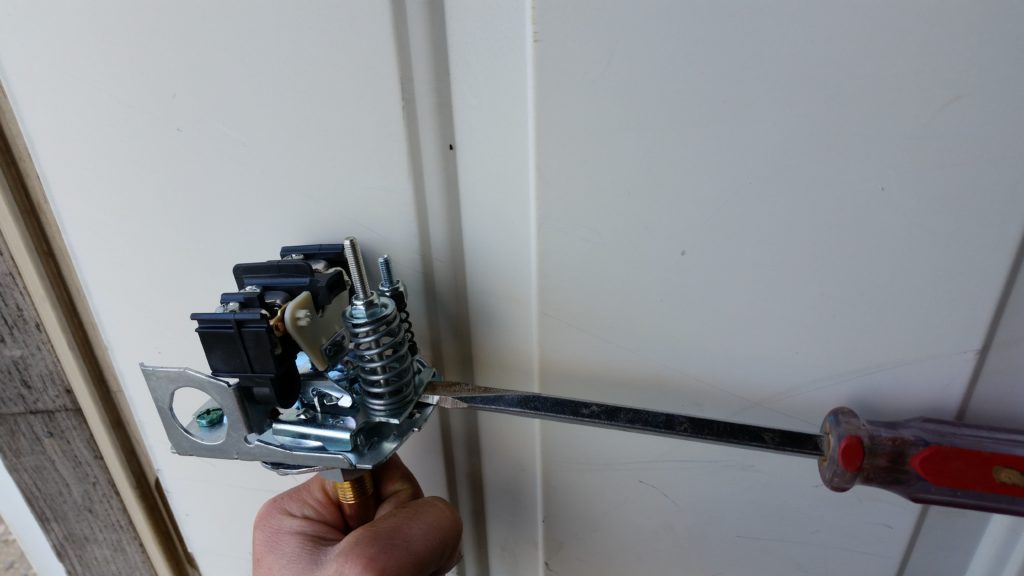
Image 6

Step 5
Check the breakers or fuses and make sure they are not tripped or blown. (Image 6)
-If none of this works you can give us a call at 509-765-8795 and we would be happy to come get your water back on. If you are not ready for us to come out yet and you have a multi-meter you can proceed to step 6 below for some more in depth troubleshooting.
Step 6
If you have access to a multi meter and have a basic understanding of it you can use it to help you diagnose further.
Step 7
Go back to the control box and take off the lid, turn your multi-meter to Vac and check for 230V (or very close) between L1 and L2…Image 7. Make sure you are not checking L1 or L2 to ground this will only tell us if it will shock you.
-If you have 230V or close skip down to step 10.
-If you don’t have 230V or close move on to step 8.
Image 7
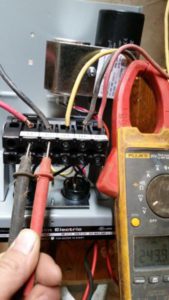
Image 8

Step 8
Now we need to check for power at the pressure switch. The pressure switch has 2 lines going in and two lines going out. We need to check both the pair that is coming in and the pair that is going out. For example in image 8, wires 2 and 4 are a pair either going in or coming out, while wires 1 and 3 are a pair because they both go to the same covered (grey) wire. So with this wiring we would need to check for 230Vac between 2 and 4, and between 1 and 3. Your switch may not be wired exactly this way but you just need to find the pairs of wires and check for power between them.
-If one set has 230V and the other does not the switch needs to be changed.
-If neither sets have power move to step 9.
Step 9
Check the breaker. You can also pull the panel off the breaker box and check for power right out of the breaker, reading between the two terminals. You do this on the breaker labeled pump which is usually a 2 pole breaker (red circle image 9).
-If you don’t have power coming out of the breaker check for power coming into the breaker box main. It usually looks like something like the green circle on image 9. If there is no power coming into the main then there is something wrong with whatever is feeding your box.
-If you have power coming into the box but not out of the breaker your breaker is bad and needs to be changed.
-If you have power coming out of the breaker, either the line from the breaker to the pressure switch is bad or you did step 8 wrong.
Image 9
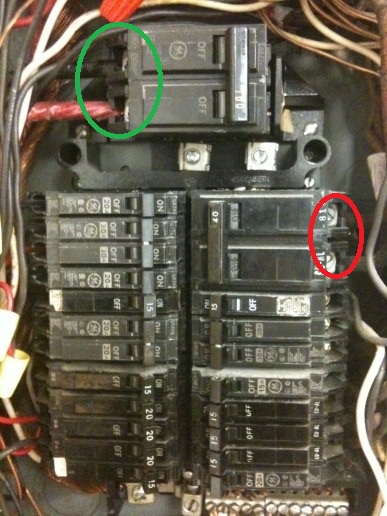
Image 10
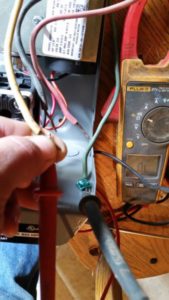
Step 10
If you have power at the control box, and the pump will not run, turn off the breaker that feeds the pump. If you have a 1.5HP or bigger you need to take the yellow, black and red wires out of their terminals. If you have the 1HP box then they can stay hooked up. Once that is done set your multi-meter for continuity Ω check between yellow and black which should be about 1.7 – 2.2 Ohms. After that you need to check between yellow and red which should be about 8.0 – 9.7 Ohms.
-If there is no continuity between either pair there is a broken wire somewhere down the well.
-If there is continuity between both pairs and they are within spec move on to step 11.
Step 11
The final thing you can do is to check for a ground down the well. Once again set your multi-meter for continuity Ω and check between the three pairs, yellow-green, black-green, and red-green. If there is no green wire then you should ground one lead to the metal water pipe the pump is connected to. The meter should ideally read nothing however, anything over 2000ohms is acceptable. If the meter beeps or reads significantly below 2000ohms there is a ground down the well and it needs to be pulled and fixed.
Image 11
If none of this works there is a bigger problem and it would be best to give us a call and we would be happy to come out and take a look at what’s going on.
Call us at 509-765-8795